Overview
In one of my last posts, I talked about the differences between Microsoft Sentinel workbooks and PowerBI. In this post, the first of however many I decide to write, we will look at converting the Security Operations Efficiency workbook into PowerBI.
Why this workbook? There are a few reasons.
- It has different steps in it making it complex enough to work with
- The queries are not all that complicated
- You can get to the workbook directly from a link in the Incidents page’s header
This will not be a direct translation, mainly since I am not a statistics nut, I don’t care about mean times or percentiles. Also, there is one step called “Recent Activities”. I will also not include the “Actions per user” step because I have not found this to be valuable.
I also will not be translating that since it could take up a lot of storage space within PowerBI. I am hoping that this feature will show up in MS Sentinel sometime soon. Fingers crossed.
BTW, there does appear to be a bug in the workbook. The KQL code for the “Incidents by closing classfication” is using “TimeBrush” to filter the “TimeCreated” column when it should be using “TimeRange”.
The Workbook
The image below shows a bit of the workbooks’ page. Scroll down in the workbook to see the rest of the page. This is taken from my personal environment so there is not a lot of data in it.
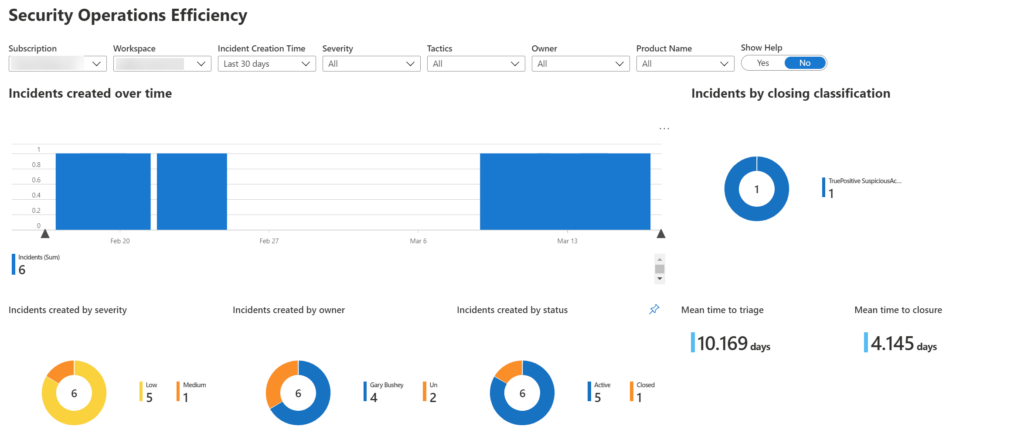
The first step in the transformation is to look at all the various steps and determine what information we will need. We can then design the KQL query. So, looking at the various steps, it seems like we would need
- Incident Name
- Incident Description
- Incident Number
- Creation date/time
- Closing classification
- Severity
- Owner
- Status
- Product Name
- Mitre Tactics (note that this workbook has not been updated to work with Mitre techniques yet)
- Incident tags
- Classification Reason
- Classification Comment
In addition, there are some other fields that you may want to include if you want to do translate some of the stats fields
- Closed Time (used in Mean Time to Closure)
- FirstModifiedTime (used in Mean Time to Triage (MTTT) and the Time to triage percentiles steps). Personal note: I don’t like the formula they use here since I have a playbook that automatically adds information to the incident in the form of a comments, so my MTTT is very, very low). If you want to do this, I would suggest using the KQL I wrote about a while ago to check for when either a user is assigned or the status is set to active. Again, be careful of automated actions that may mess this up.
Not too bad of a list. I’ll include the optional fields since they could be useful.
We should also think about other fields we may want to use in the future, keeping in mind the storage costs. Some of the others that may be useful include
- Incident URL
- MITRE Techniques
- Comments (keep in mind that PowerBI will not show the formatting of the comments correctly)
- Incident Description (again, if you use the Markdown formatting, this will not show up correctly)
Creating the query
If you really wanted to, you could all the columns from the incident through just in case. For this post, we will only send those that we have listed above (which is almost all of them anyway)
The first step, in our case, is to get the latest and greatest Incident entries in the “SecurityIncident” table. If you are not aware, every time an incident is modified a new row is added to the “SecurityIncident” table. We only care about the latest entry (determined by the “TimeGenerated” column) which will have all the upates we care about.
SecurityIncident
| summarize arg_max(TimeGenerated, *) by IncidentNumber
In the code above, we use the “arg_max” aggregation function to show only the latest row based on the “TimeGenerated” field. The “*” means to show all the columns from that row. Go to arg_max() (aggregation function) – Azure Data Explorer | Microsoft Docs for more information. By filtering by “IncidentNumber” we ensure that we only have one row per incident
This will get us what we need, and we could just use that to send all the data, but we want to limit what we want to send. So to get the owner information, we need to extract some data from the “Owner” column. We could extract this in PowerBI but I feel it is easier to do it here.
| extend OwnerName = Owner.assignedTo, OwnerEmail = Owner.emailAlong the same lines, we will get extract the tactics and techniques we want to use.
| extend Tactics = AdditionalData.tactics, Techniques=AdditionalData.techniquesThese are both arrays and we will handle that in PowerBI.
Our final query should look like
SecurityIncident
| summarize arg_max(TimeGenerated, *) by IncidentNumber
| extend OwnerName = Owner.assignedTo, OwnerEmail = Owner.email
| extend Tactics = AdditionalData.tactics, Techniques=AdditionalData.techniques
| project Title, IncidentNumber, Description, Severity, Status, Classification, ClassificationComment, ClassificationReason, ClosedTime, Comments, CreatedTime, Owner, ProviderName,IncidentUrl, OwnerName, OwnerEmail, Tactics, Techniques
Run this but make sure your Time Range is set to at least 3 days. This will be useful down the road.
Exporting the data
Once you know the query works, under the “Export” button in the header, select “Export to Power BI (M query)”. A “M query” is how PowerBI obtains its data.

When you select this, a file called “PowerBIQuery.txt” will download. This will contain the instructions needed to import the data into PowerBI. Go ahead and open it.
The first 8 lines are a comment explaining how to import that data into PowerBI. The rest is the code you need to put into PowerBI to get the data. There a couple of items I would like to point out here. I have pasted the entire document below and bolded the items to point out. Note that I have replaced the actual workspace GUID with the text “<workspaceid>”.
The first thing is that the workspace GUID, which I replaced with “<workspaceID>”, points directly to the workspace that you used to create the query. If you are going to use this with a customer, you will need to change that GUID.
The second is the timespan (set to “P7D” below). This means that this query is going to look 7 days in the past to get the data. You can set this number to whatever you want. In a later post, I will show you to use a parameter here.
/*
The exported Power Query Formula Language (M Language ) can be used with Power Query in Excel
and Power BI Desktop.
For Power BI Desktop follow the instructions below:
1) Download Power BI Desktop from https://powerbi.microsoft.com/desktop/
2) In Power BI Desktop select: 'Get Data' -> 'Blank Query'->'Advanced Query Editor'
3) Paste the M Language script into the Advanced Query Editor and select 'Done'
*/


let AnalyticsQuery =
let Source = Json.Document(Web.Contents("https://api.loganalytics.io/v1/workspaces/<workspaceID>/query",
[Query=[#"query"="SecurityIncident
| summarize arg_max(TimeGenerated, *) by IncidentNumber
| extend OwnerName = Owner.assignedTo, OwnerEmail = Owner.email
| extend Tactics = AdditionalData.tactics, Techniques=AdditionalData.techniques
| project Title, IncidentNumber, Description, Severity, Status, Classification, ClassificationComment, ClassificationReason, ClosedTime, Comments, CreatedTime, Owner, ProviderName,IncidentUrl, OwnerName, OwnerEmail, Tactics, Techniques",#"x-ms-app"="OmsAnalyticsPBI",#"timespan"="P7D",#"prefer"="ai.response-thinning=true"],Timeout=#duration(0,0,4,0)])),
TypeMap = #table(
{ "AnalyticsTypes", "Type" },
{
{ "string",   Text.Type },
{ "int",      Int32.Type },
{ "long",     Int64.Type },
{ "real",     Double.Type },
{ "timespan", Duration.Type },
{ "datetime", DateTimeZone.Type },
{ "bool",     Logical.Type },
{ "guid",     Text.Type },
{ "dynamic",  Text.Type }
}),
DataTable = Source[tables]{0},
Columns = Table.FromRecords(DataTable[columns]),
ColumnsWithType = Table.Join(Columns, {"type"}, TypeMap , {"AnalyticsTypes"}),
Rows = Table.FromRows(DataTable[rows], Columns[name]),
Table = Table.TransformColumnTypes(Rows, Table.ToList(ColumnsWithType, (c) => { c{0}, c{3}}))
in
Table
in AnalyticsQuery
Adding the data to PowerBI
Now we are ready to add the data to PowerBI. Following the instructions in the document you just downloaded, makes it easy.
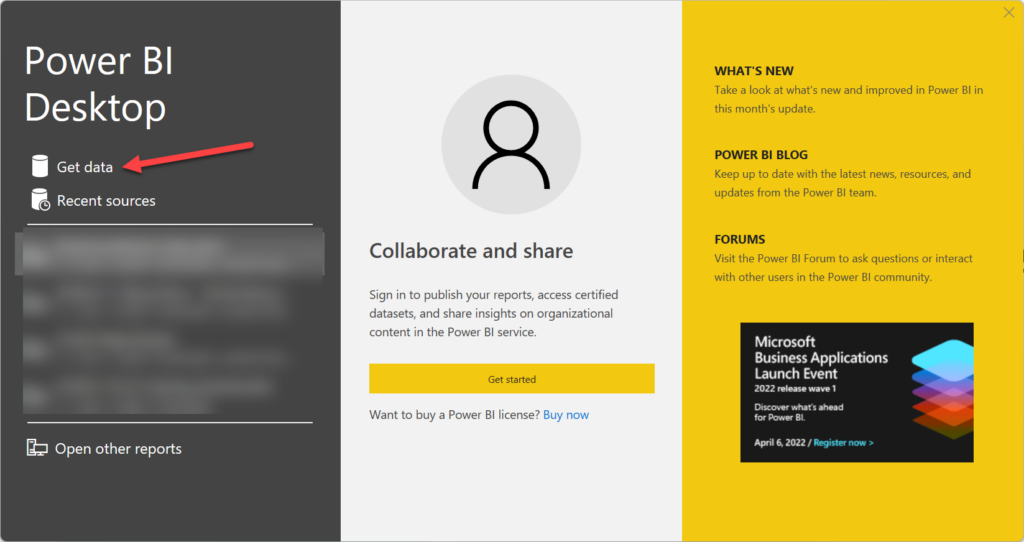
If are just starting PowerBI, it will ask you where to obtain the data from. Select the “Get data” entry as shown below.
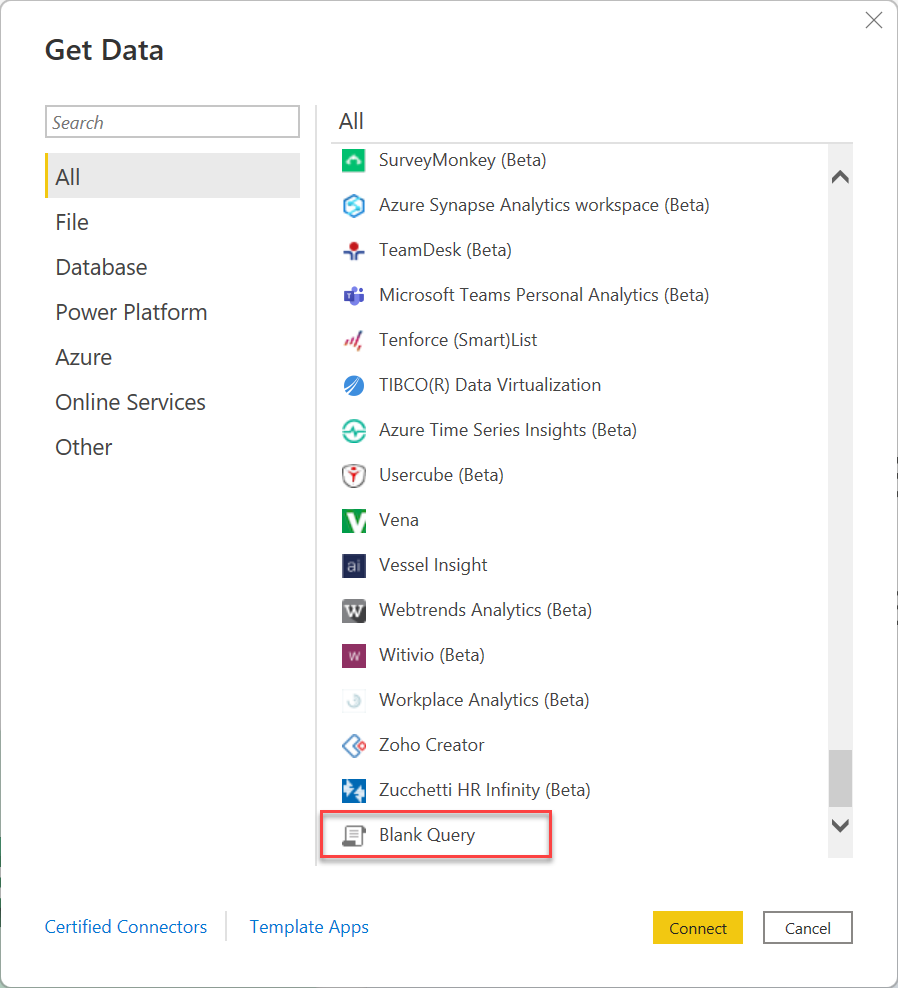
This will open another pop-up where you need to determine your data source. Scroll all the way to the bottom of the list and select “Blank query” as shown below.
If you have already started PowerBI, you can click on the “Get data” button in the header in the “Home” tab.
Once you have selected the “Blank query”, the “Power Query Editor” window will open. Click on the “Advanced Editor” button as shown below
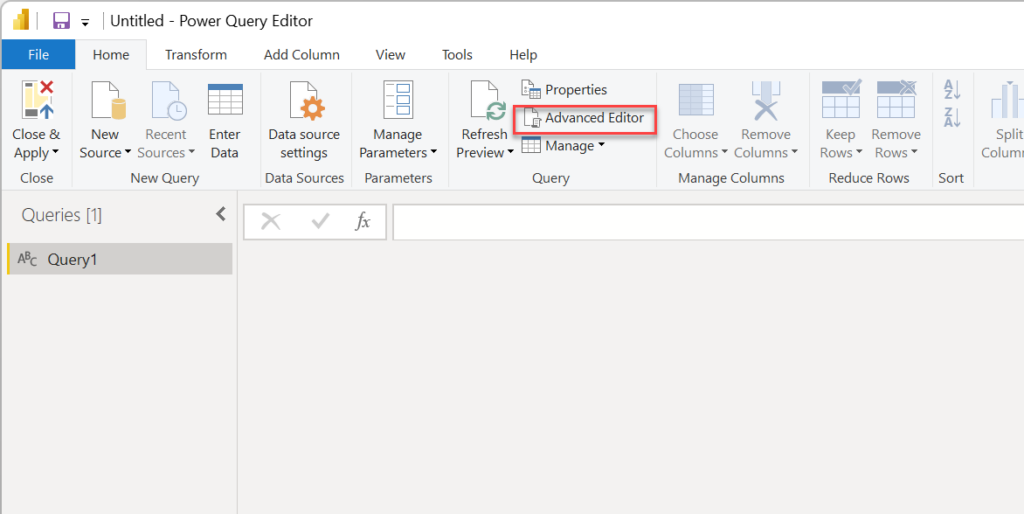
This will open the query editor box. Select all the text in it and replace it with the code from the document you downloaded and then click the “Done” button.
Most likely you will see a message like the one in the image below asking you enter your credentials to login. Click on the “Edit Credentials” button to continue.

The “Access Web Content” window will show. Click on “Organizational account” and then click on the “Sign in” button.
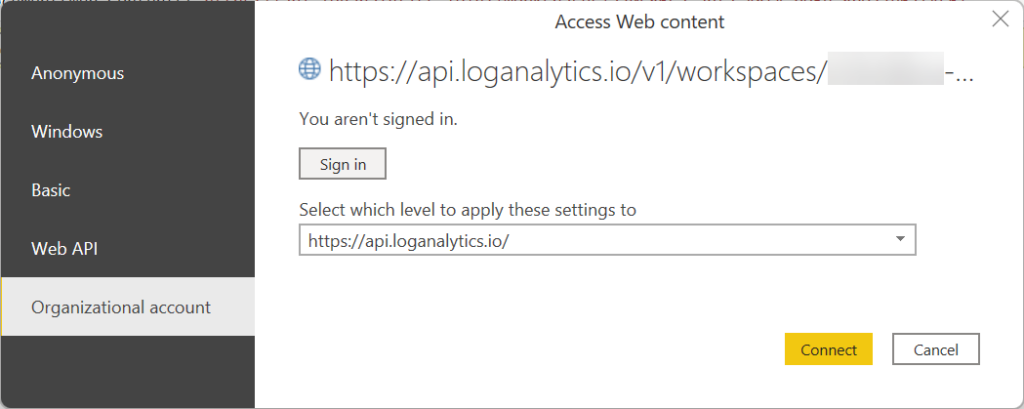
Login with any account that has at least Read rights to your data. You will probably want to create an account that has only those rights for better security.
Once you have signed-in, click the “Connect” button to connect and download your data. Depending on how many incidents you have, you will get a different number of rows showing. The screen should look similar to the image below
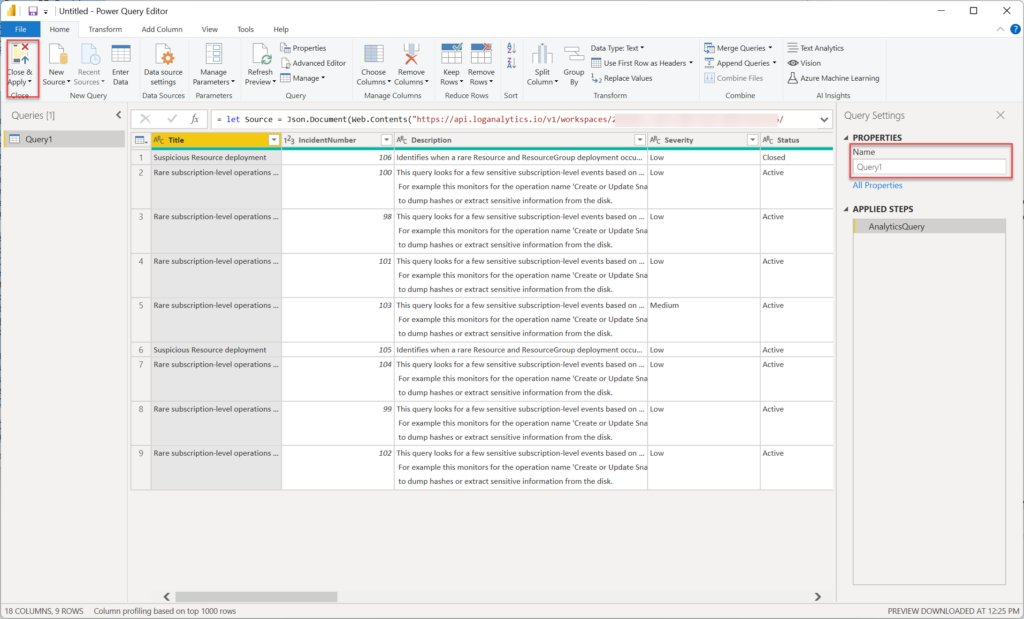
If you look on the right side of the screen, you will notice that the table is called “Query1” which is the default. I recommend changing this to something more descriptive. In this case, I will change it to “SecurityIncidents”. Once you have the name changed, click on the “Close & Apply” button in the header.
There will be a pop-up telling you that your data is being loaded. If you click on the “Data” button on the right (looks like a table), you can see your data as shown below.
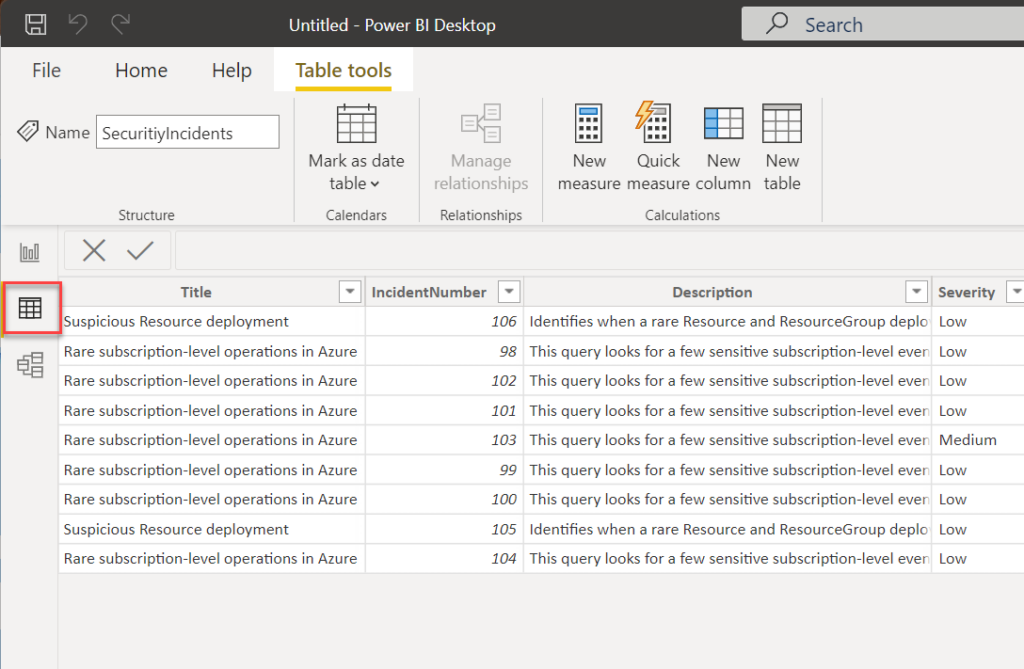
Congratulations! You now have data that you can play with.
Summary
In this blog post we looked at a Microsoft Sentinel workbook, determine what data we needed, wrote the query to get the data, and added it to PowerBI.
In the upcoming blog posts, we will look at how to use this data, and others, to generate PowerBI reports.