Introduction
I recall reading a post where someone asked if there was a way to generate a word document when an incident was closed for reporting purposes. There is no built-in way, but by using a Playbook, a Team’s site (or other SharePoint site), and a Word template, you can do this.
The Playbook, Word template, and a sample output can be found at garybushey/CreateIncidentWordDocument: Create a word document from the incident’s data (github.com)
Caveats
There are some caveats to this. The first of which is I am using the “Word Online (Business)” connector, so if you do not have Word online for your business you cannot use the Playbook I have created. Unfortunately, even with this, there are other limitations.
If you go to the page for this connector, located at Word Online (Business) – Connectors | Microsoft Learn, there is a section titled “Known issues and limitations”. One of the big ones is that you cannot use the Rich Text Content control. This means that if your description or title is using HTML or Markdown language, you will see the raw information and not the formatted data. It is highly recommended that you read this page completely as it has useful information regarding repeating sections as well.
There is another company, Plumsail, that has a connector which appears to be more feature rich, but it is not free. NOTE that I am not recommending Plumsail or the connector, it is just another connector I came across while working on this blog post. You can get more information here Plumsail Documents – Connectors | Microsoft Learn
Create the document template
It is pretty easy to create a document template. You need to enable the “Developer” tab in your Word program. Note that another possible issue is that you cannot do this with Word online, you must use the desktop client.
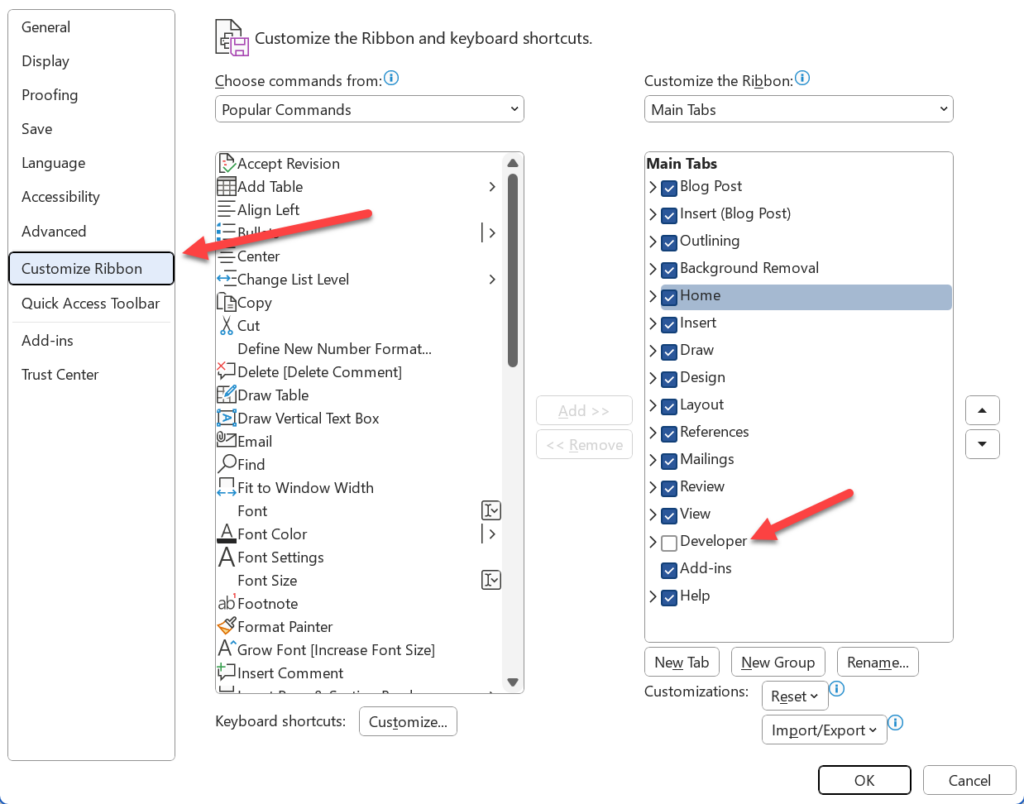
To enable this, open Word, go to “Options”, select “Customize Ribbon”, and then on the right side under “Main Tabs”, select “Developer”, and then click “OK” as shown below:
Once that is done, open a new document and select the “Developer” tab. There will be a listing of controls as shown below:
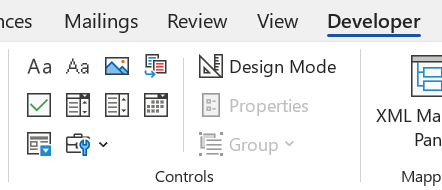
In this example, we will only be using 2 control, “Plain Text Content Control” (second from the left in the top row) and “Repeating Section Content Control” (first one on the left in the bottom row). You can use the others, keeping in mind that the controls listed below will not work with the “Word Online (Business)” connector:
- Rich Text Content Control
- Building Block Gallery Content Control
- Date Picker Content Control
- Check Box Content Control
- Legacy form controls
When you drag a control onto the page, use the “Properties” button to give it a unique name. The picture below shows what the template I am using looks like. Note that “Comment” is a different color than the rest since it is a repeating section.
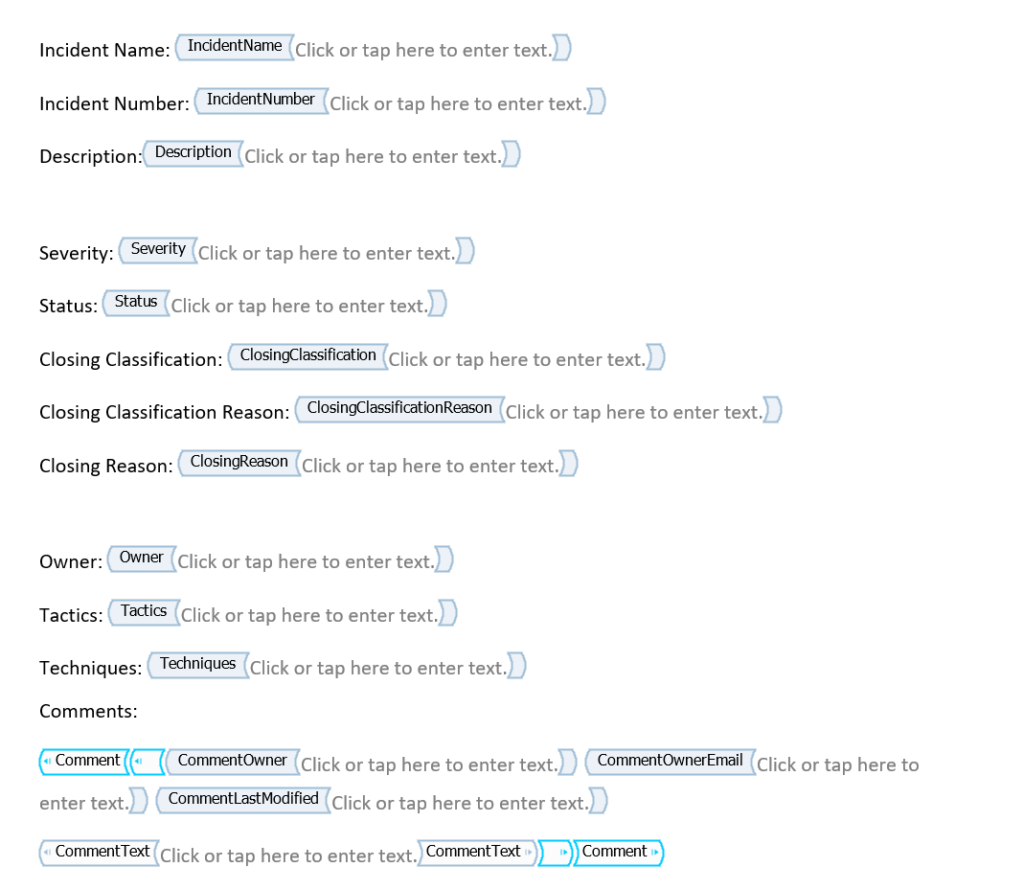
To create a repeating section, add the controls that you want to repeat. In this case all the controls that start with “Comment” and then select “Repeating Section Content Control”.
Playbook
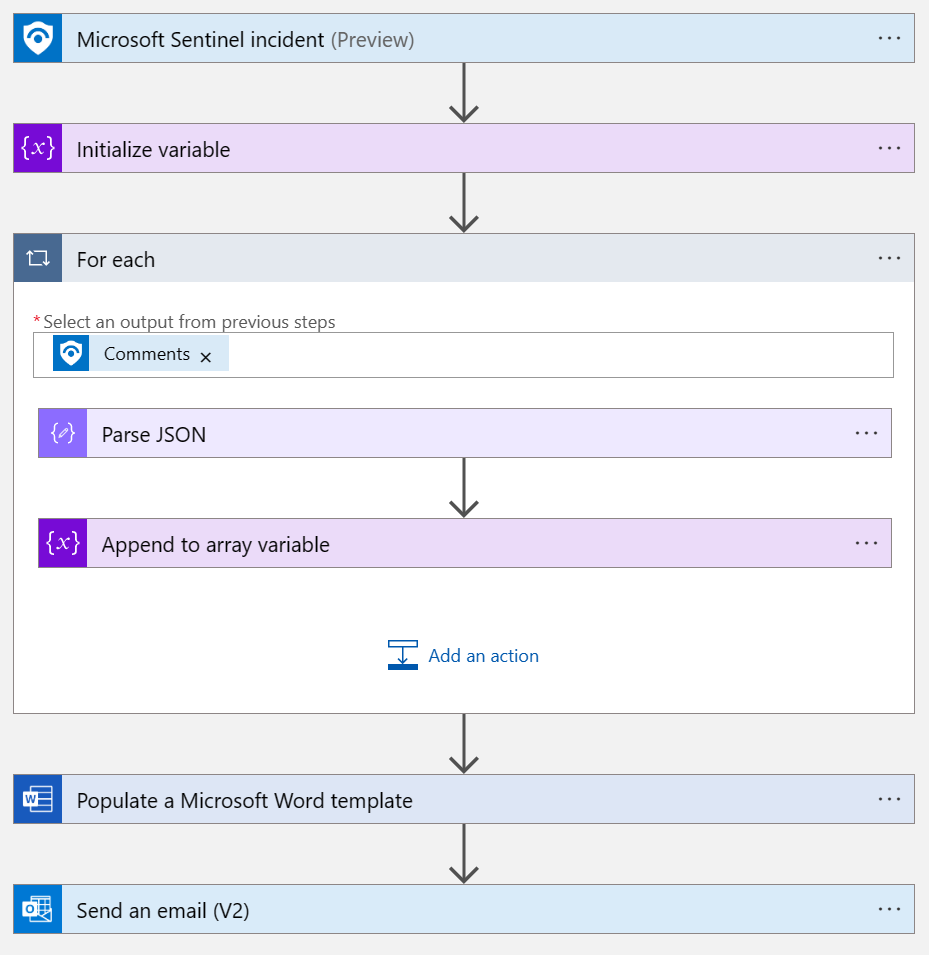
The playbook uses the “Microsoft Sentinel Incident” trigger. Then a new array variable is initialized which will be used to store the comments we want to add.
A “For Each” action is added to work with the comments. Inside that, we parse the comment’s JSON and then add the needed information into the comments array variable.
Finally, we will use the information to populate our word template and then, in our case, send an Email that has the populate template as an attachment.
I am not going to go over the first 3 steps as those are easy enough to do. You can run the playbook without any controls other than the trigger to get the comments JSON and use that to create the schema in the “Parse JSON” connector.
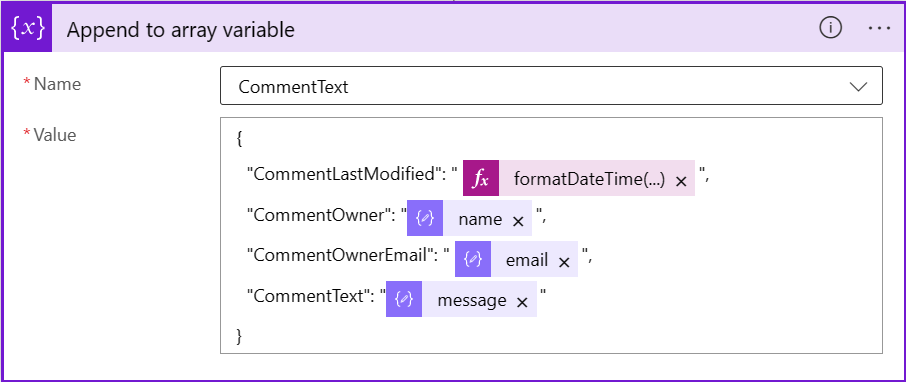
For the “Append to array variable” action, refer to the image below. We need to create a JSON array and most of the work is taken care of the variable itself, but we need to add the actual information as shown below. NOTE: The names you use inside the JSON array MUST match the names you use in the template.
Populate a Microsoft Word template
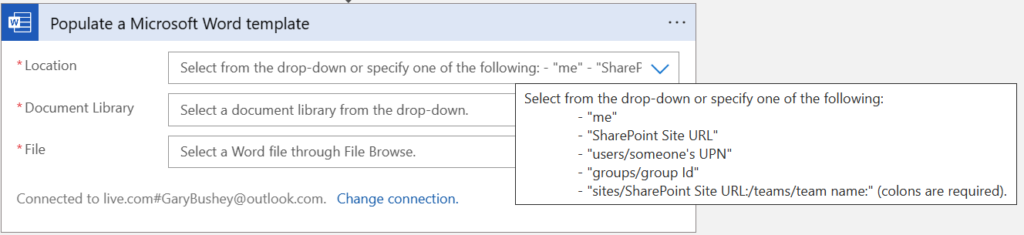
This is the action that does most of the work for us. When you first add it, it will ask for a location as shown below (with the tooltip selected):
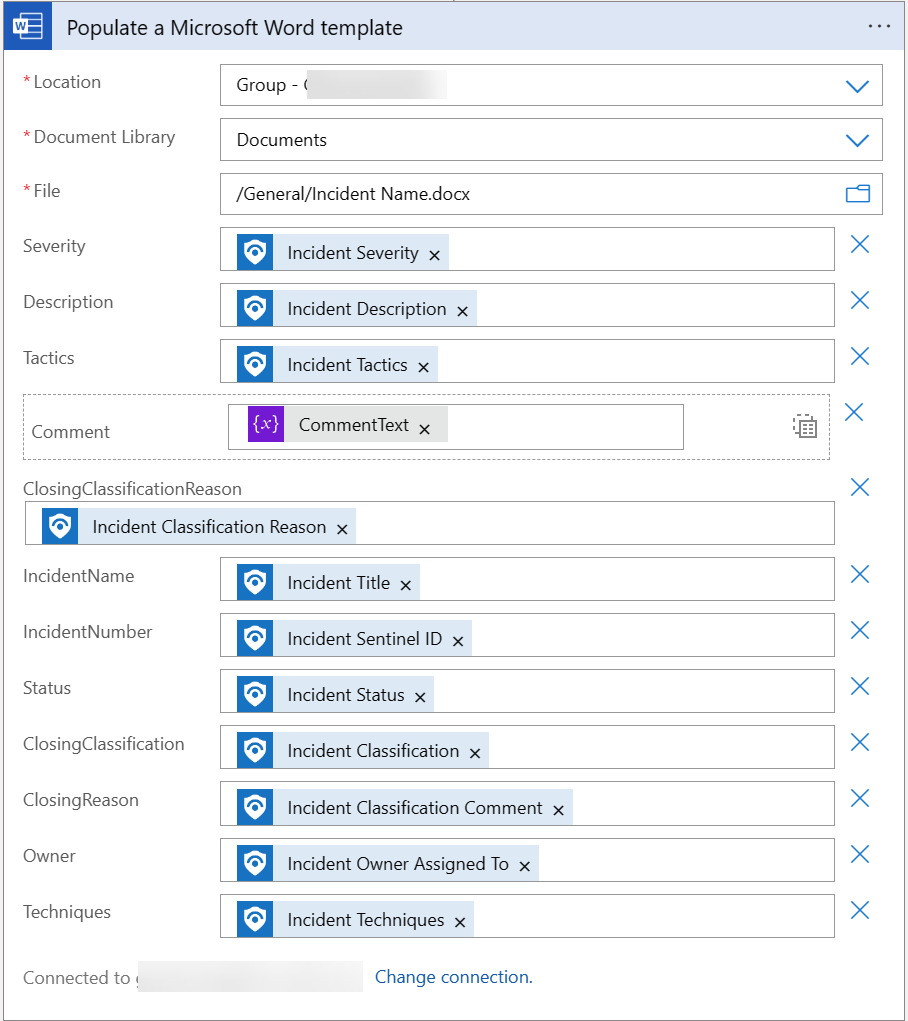
I used a Teams site in my example since it was easy to do. Once you login, the drop down will populate with various places you can access with Teams sites showing up as “Group”.
You then need to select the Document Library where your template will reside. The drop down will populate with choices here as well.
Finally, select the actual template file. You can open up a file picker to find your file. Once the file has been selected, you will see an “Add new parameter” drop down at the bottom of the connector. Select it and then select all the fields you have added to your template. Then populate the various fields, using the array variable for “Comment”. I switched that field to use the array variable, rather than filling in each field individually since it would be difficult to do that the way we have the playbook setup. When you are done, it should look similar to what is shown below:
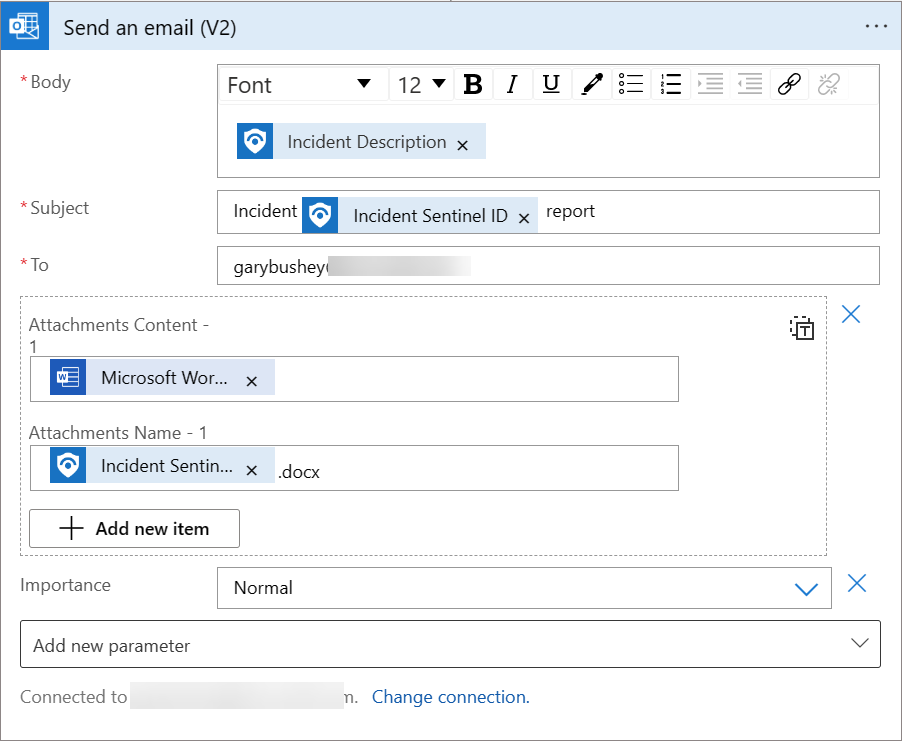
Finally, I send this as an Email with the filled-out template as an attachment. Luckily, the “Populate a Microsoft Word template” action provides this as an ouput.
The image below shows what the filled in word template would look like. There is a LOT of room for improvement 🙂 The template is very basic and there is more that could be done for the tactics and techniques. Unfortunately, the way Microsoft Sentinel stores the information makes it hard to determine which technique goes with which tactics.
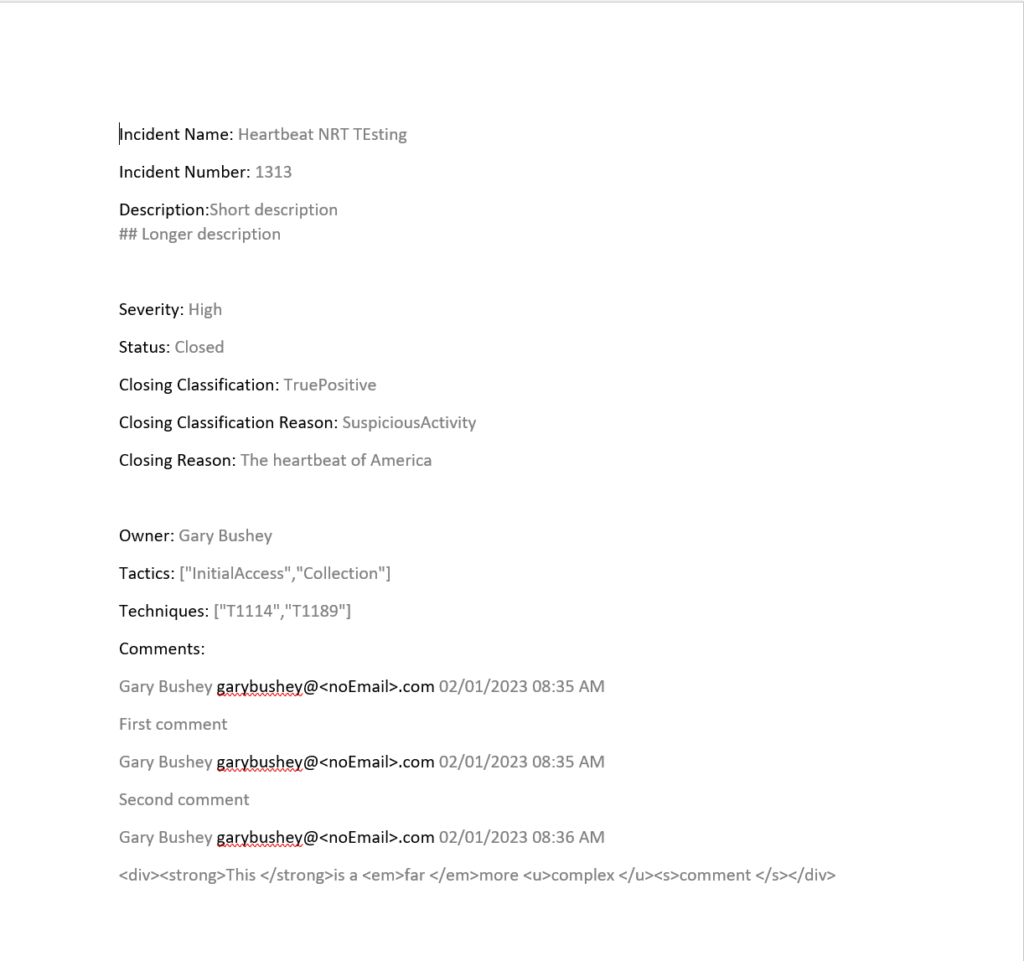
And, yes, the incidents description is correct. Wanted to see how the Markdown language looked. Also, note that some comments use HTML so those are not showing up very well either. Finally, the Email address in the Comments section is darker than the rest since I modified the text to not show my actual email address (which I am sure most people could figure out easily enough).
Running the playbook
There is nothing that says this playbook cannot be run whenever you want, but if you want to run this when an incident is closed, create a new Automation rule. Then, for the Trigger, select “When an incident is updated” and then add a condition for when the “Status” is changed to “Closed”.
Have this rule kick off the playbook and you are good to go. You can also manually run the playbook against an incident if you need a report for some reason.
Additional options
If you noticed when looking at the “Word Online (Business))” connector, there is a “Convert Word Document to PDF” action. This is useful is you need to make sure the document that was generated cannot be edited.
Unfortunately, this action must take a file that has been saved somewhere, it will not take the output from the “Populate a Word Template” action. What you can do is the use the “SharePoint” connector’s “Create file” action to save the file into Teams and then use the “Convert Word Document to PDF” to convert the file into a PDF file and email that (and/or save it). Then use the “SharePoint” connector’s “Delete file” action to the word document.
Summary
The blog post showed you how to create a (very) basic word template that can be used to create a report when needed. There are limitations to the way I did it, including not being able to show rich text, but it does demonstrate the steps needed. Hope it helps.
“What you can do is the use the “SharePoint” connector’s “Create file” action to save the file into Teams and then use the “Convert Word Document to PDF” to convert the file into a PDF file and email that (and/or save it). Then use the “SharePoint” connector’s “Delete file” action to the word document.”
Interesting limitation here.
If you save the file to a sharepoint and then try to retrieve it with the PDF convert command then it will not be able to find the file. Convert seems to need the file ID of a preexisting file that gets passed to the method. It doesn’t appear to identify files based on path\locator\id\filename\display name etc.
Thanks for pointing that out.
Ignore 🙂
Sorted out the file issue.
If i don’t use the output of the Sharepoint create file and instead just hardcode the expected path then the file convert works.
To make up for jumping the gun above.
For anyone else using this that want’s rid of the HTML then add the “HTML to text” command and pass in the parsed comments message field. Then pass the output of that to the Append to array CommentText field 🙂
So the for each becomes — parse Json . html to text . append to array