Introduction
While all my previous posts regarding calling Microsoft Sentinel REST APIs have been done in PowerShell, that is definitely not the only way to call them. PowerShell is a great language and has its place but so does JavaScript and C# (which will be a blog post in the near future).
We will utilize the Microsoft Authentication Library (MSAL) to do the login and obtain the needed tokens for authentication. You can more information regarding the MSAL at Learn about MSAL – Microsoft Entra | Microsoft Learn. We will be using MSAL for React in this post. However, if you look at the web page, you will see that MSAL is available for most languages and platforms.
Why React? There are a few reasons
- It is a popular tool
- It is a new technology that I am very interested in learning
- There are lots of samples that I could base my code on already 🙂
A large portion of the Azure portal is also written in React, so I have been told, so that doesn’t hurt either.
You can download this code from garybushey/CallSentinelRESTApiFromJavascript: Call Microsoft Sentinel REST APIs from Javascript (github.com)
Setup
To begin, follow the instructions in this tutorial: Tutorial: Register a Single-page application with the Microsoft identity platform – Microsoft Entra | Microsoft Learn It will get your React web app setup and running. Once you have completed all the steps, or just downloaded the code, you will be able to make a call to get some user data from a Graph API call.
The issue
You would think that if you could make one call to an Azure REST API, AKA the aforementioned Graph API, it would be easy to make a call to others. Sadly, no. Even when I changed the code to call a Microsoft Sentinel REST API, I would get an error telling me that the passed in authorization did not match the account used.
Confusing error message to say the least, since I was using the same account as before. It took a bit of research, but I was finally able to figure out the issue.
The solution
The solution is actually in 2 parts. First, your Azure AD application needs to have the “user_impersonation” API permission. Second, you need to change the scope of your calls.
Both parts are explained below.
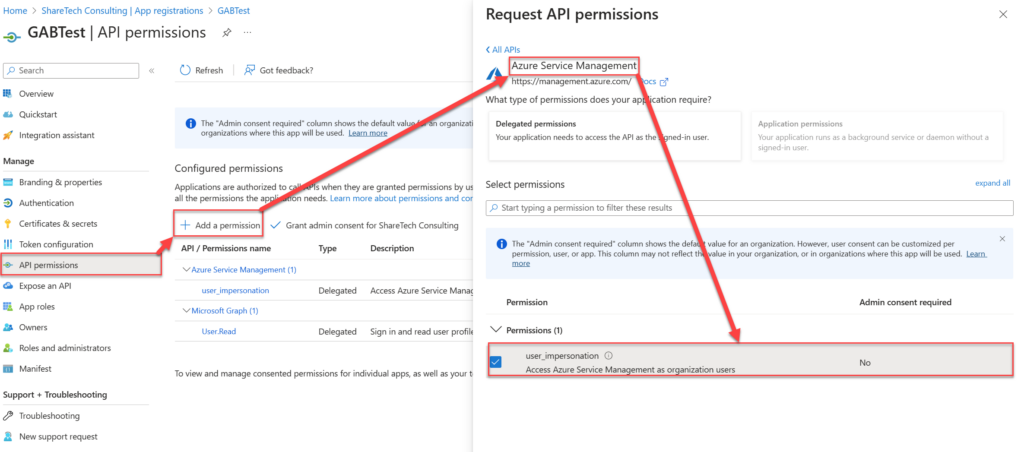
Modify your Azure AD Application
This is very simple to do. In Azure AD in the Azure portal, find and select your application. Then, in the Manage section, select “API Permissions”. Click on “Add a permission” and then find the “Azure Service Management” section. In that, select “user_impersonation” as shown below.
Modify your code
This will take a bit longer as there are a lot of changes. Each change is listed below.
App.css
Added an entry to show the different entries
.profile-div {
  border-bottom: 5px solid red;
}
App.jsz
Minimal changes here. I just changed the message that is part of the “UnauthticatedTemplate” to read “Please sign-in to get your rules.”
authConfig.js
Lots of changes here!
First, I added a new constant where you will need to enter your workspace information including the Subscription ID, Resource Group Name, and Workspace name
export const sentinelRuleBase = {
  subscriptionID: "",
  resourceGroupName: "",
  workspaceName: "",
};
Then, in the “loginRequest” constant, the scope needs to be changed to “https://management.azure.com/.default” This is what allows the MSAL to call the Microsoft Sentinel REST APIs. I got rid of the existing scope since we will not be making a call to the Graph API
export const loginRequest = {
  scopes: ["https://management.azure.com/.default"],
};
Finally, I added a new constant for the URL to call. There are other ways of doing this and, if I work on this code more in the future, I will probably create an entry that contains the base URL (everything up to “Microsoft.SecurityInsights”) so that you would only need to add the information for the actual call, “alertrules” in this case, and the API version.
export const alertURL = {
  url: "https://management.azure.com/subscriptions/" + sentinelRuleBase.subscriptionID + "/resourceGroups/" + sentinelRuleBase.resourceGroupName + "/providers/Microsoft.OperationalInsights/workspaces/" + sentinelRuleBase.workspaceName + "/providers/Microsoft.SecurityInsights/alertrules?api-version=2023-03-01-preview"
};
graph.js
I modified the code here to call the URL we created above, rather than the Graph API call. Future revisions will have this renamed to a more generic name.
return fetch(alertURL.url, options)
        .then(response => response.json())
        .catch(error => console.log(error));
components/PageLayout.jsx
Minimal changes here. Mainly just changing the text to show you are calling Microsoft Sentinel REST API calls, rather than the Graph API
return (
    <>
      <Navbar bg="primary" variant="dark" className="navbarStyle">
        <a className="navbar-brand" href="/">
          Microsoft Sentinel
        </a>
        <div className="collapse navbar-collapse justify-content-end">
          {isAuthenticated ? <SignOutButton /> : <SignInButton />}
        </div>
      </Navbar>
      <br />
      <br />
      <h5>
        <center>
          Welcome to the Microsoft Sentinel Rules using Javascript Demo
        </center>
      </h5>
      <br />
      <br />
      {props.children}
    </>
  );
components/ProfileData.jsx
Some important changes here. The main one being that since the Graph API only returned one value and our call can return multiple values, we need to iterate over the values being returned and output the information for each one. I am not going into the actual JavaScript that is there, just now that the “element” variable will contain the JSON for a single rule. If you have followed any of my other posts regarding how to call APIs, you will know what to do with the code.
I did convert the “enabled” property to “Enabled” or “Disabled” to follow what shows up in the Sentinel portal. I also have a constant called “x” that I was using for debugging and forgot to get rid of before upload the code 🙂
//Array.prototype.forEach.call(props.graphData.value, element => {
    props.graphData.value.map((element, i) => {
      var enabledRule = "Enabled";
      if(element.properties.enabled.toString() !== "true")
      {
        enabledRule = "Disabled";
      }
      const x="";
      return (
      <div className="profile-div">
        <p>
          {/* <strong>First Name: </strong> {props.graphData.givenName} */}
          <strong>Title: </strong> {element.properties.displayName}
        </p>
        <p>
          <strong>Rule Type: </strong> {element.kind}
        </p>
        <p>
          <strong>Enabled: </strong> {enabledRule}
        </p>
        <p>
          <strong>Severity: </strong> {element.properties.severity}
        </p>
      </div>
    )
Running the Application
After filling in the needed information in the “authConfig.js” file, make sure to run “npm install” to install all the needed modules. There are a lot that are out of date and I hope to work on that in the future.
Type “npm start” to kick off the application. A web page that points to “http://localhost:3000” will open up and you can login and press the button to get the rules. Once that runs you should see information like shown below.
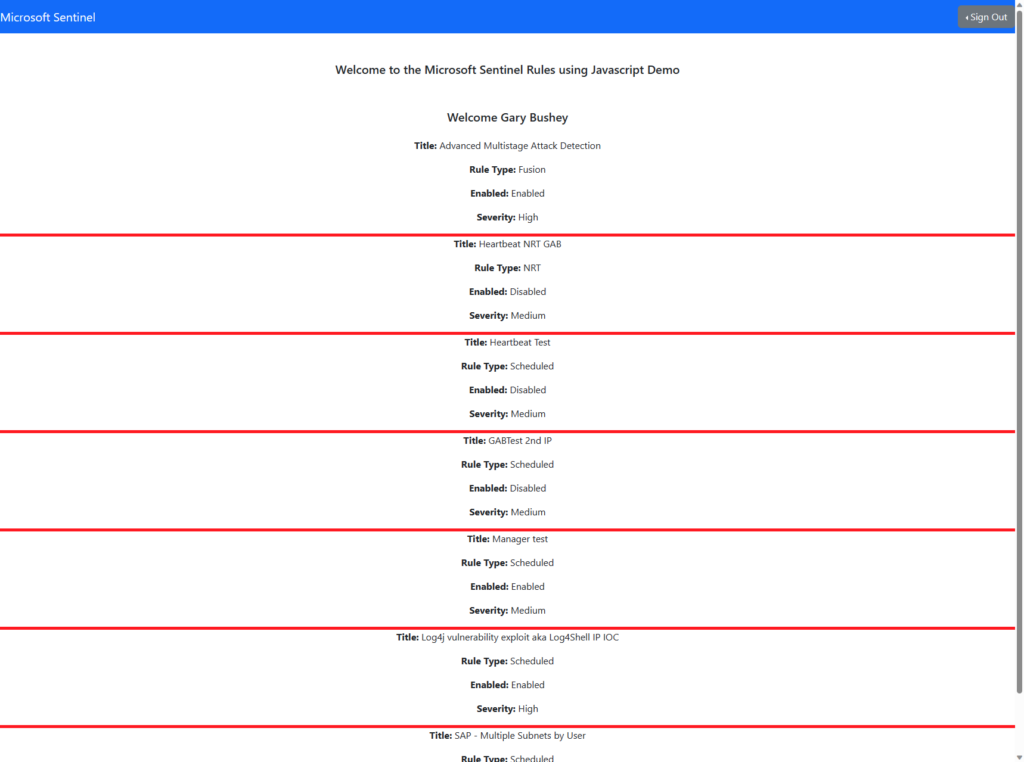
One thing I plan on doing in the near future is to learn React enough to make this look a lot better.
Summary
This post showed you how to call Microsoft Sentinel REST APIs using React and the MSAL. I do plan on investigating this a lot more and see what I can do with hit. My ultimate goal is to be able to the rule update that I currently have in PowerShell as a full React app that gets run in the portal, but we will see.