Introduction
Some exciting news!
- I have updated the “Export-AzSentinelMITREToCSV.ps1” file so that the individual rules can be saved to the CSV file instead of just the counts. This can be found in my GitHub repo here
- An older version of this can be found in the official Microsoft Sentinel GitHub repo located here. I am going to upload the new version and the file below ASAP.
- I have created another file called “Export-AzSentinelMITREIncidentsToCSV.ps1” which will be discussed here. This file can also be downloaded from my GitHub repo here
Exporting incidents
When I was thinking about how to do this, I realized there were two big issues I had to solve:
- How to determine the start date/time
- How to get all the incidents instead of just the 50 that the REST API call returns as a default.
For the first issue, I turned to using Windows forms within PowerShell. This allows you to create a nice GUI that will allow the user to select the start time. I based this off of the Logs page in Microsoft Sentinel to make it easy to use. I have not tried this on a non-Windows machine, so I have no idea if it works.
For the second issue, I realized that the call I make to get the incidents, will return a “nextLink” field that can be used to get the next batch of incidents. It was just a matter of performing a do-until loop until there was no more “nextLink” entries.
PowerShell GUI
If you have done much with C# and Windows, this code will look pretty familiar. The first thing you will need to do is add the call to the Windows Form.
Add-Type -AssemblyName System.Windows.FormsNext, I create the form to hold all the fields
$mainForm = New-Object System.Windows.Forms.Form
$font = New-Object System.Drawing.Font("Consolas", 13)
$mainForm.Text = "Time Range"
$mainForm.Font = $font
$mainForm.Width = 500
$mainForm.Height = 300
Then I create the various form objects I need to use. I have to create a GroupBox to hold all the radio buttons and the DateTimePicker is used for the custom date selection
  $groupBox1 = New-Object System.Windows.Forms.GroupBox
  $radioButtonLast24 = New-Object System.Windows.Forms.RadioButton
  $radioButtonLast48 = New-Object System.Windows.Forms.RadioButton
  $radioButtonLast3Days = New-Object System.Windows.Forms.RadioButton
  $radioButtonLast7Days = New-Object System.Windows.Forms.RadioButton
  $radioButtonCustomTime = New-Object System.Windows.Forms.RadioButton
  $datePicker = New-Object System.Windows.Forms.DateTimePicker

  #Set up the group box to contain all the radio buttons
  $groupBox1.Controls.Add($datePicker)
  $groupBox1.Controls.Add($radioButtonCustomTime)
  $groupBox1.Controls.Add($radioButtonLast7Days)
  $groupBox1.Controls.Add($radioButtonLast3Days)
  $groupBox1.Controls.Add($radioButtonLast48)
  $groupBox1.Controls.Add($radioButtonLast24)
  $groupBox1.Controls.Add($getSelectedRB)
  $groupBox1.Location = "30, 20"
  $groupBox1.Width = 400
  $groupBox1.Height = 200
  $groupBox1.Text = "Time Range"
One thing to note is that Location field is in the Y,X format. That took me a while to get the hang of 🙂
I’ll show one radio button, since they all work the same.
  $radioButtonLast24.Location = "31, 20"
  $radioButtonLast24.Name = "Last 24 Hours"
  $radioButtonLast24.Height = 17
  $radioButtonLast24.Width = 200
  $radioButtonLast24.Text = "Last 24 hours"
  $radioButtonLast24.Checked = $true
I did set the first radio button to be selected by default so this is the only that will have the “.Checked = $true” line.
After all the objects are added to the GroupBox, I add that to the form as well as the “OK” button.
  $mainForm.Controls.add($groupBox1)

  # OK Button
  $okButton = New-Object System.Windows.Forms.Button
  $okButton.Location = "15, 230"
  $okButton.ForeColor = "Black"
  $okButton.BackColor = "White"
  $okButton.Text = "OK"
  #Close the form when the OK button is clicked.
  $okButton.add_Click({ $mainForm.close() })
  $mainForm.Controls.Add($okButton)
Next, we have to show the form and then handle the date that we want to generate. Depending on which radio button was selected, we either need to subtract some hours or days from the current time or use a custom date. The dates will then be converted into UTC time, except for the custom date since it is already in UTC time.
Before we return the date, it needs to be formatted into a format that we can use in our REST API call. The text, “%Y-%m-%dT%TZ”, translates into a date like “2022-10-04T00:00:00Z” which we can use.
[void] $mainForm.ShowDialog()
$ReturnDate = ""
if ($radioButtonLast24.Checked) {
$ReturnDate = (Get-Date).AddHours(-24).ToUniversalTime()
}
if ($radioButtonLast48.Checked) {
$ReturnDate = (Get-Date).AddHours(-48).ToUniversalTime()
}
if ($radioButtonLast3Days.Checked) {
$ReturnDate = (Get-Date).AddDays(-3).ToUniversalTime()
}
if ($radioButtonLast7Days.Checked) {
$ReturnDate = (Get-Date).AddDays(-7).ToUniversalTime()
}
if ($radioButtonCustomTime.Checked) {
$ReturnDate = (Get-Date -Date $datePicker.Value).Date
}
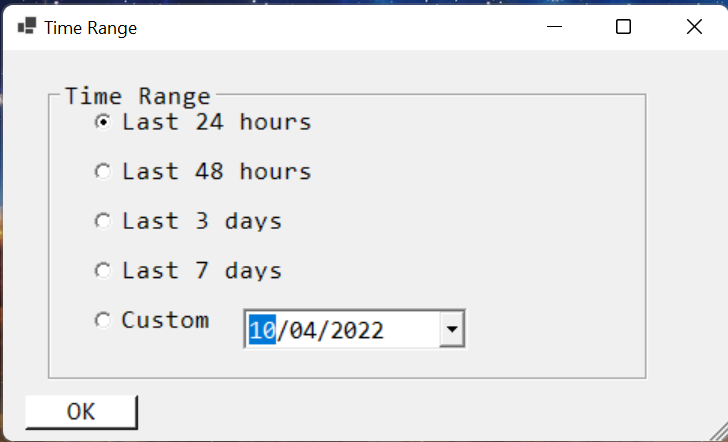
return Get-Date -Date $ReturnDate -UFormat "%Y-%m-%dT%TZ"That is all there is to get the data. The form will look like
Do-Until Loop
The first thing we need to do is to set the initial REST API call to filter based on the time selected. To do this, we can add a “filter” property after the “api-version” in the REST API call as shown below. “GetDateGUI” is the function that gets called to get the date using the code shown above. In this case, we are making sure that the “createdTimeUtc” field is greater than the date we pass in
  $url = "https://management.azure.com/subscriptions/$($subscriptionId)/resourceGroups/$($ResourceGroupName)/providers/Microsoft.OperationalInsights/workspaces/$($WorkspaceName)/providers/Microsoft.SecurityInsights/"
  $returnDate = GetDateGUI
  $url += "incidents?api-version=2021-10-01-preview&%24filter=properties%2FcreatedTimeUtc%20gt%20" + $returnDate
Now, we have a slight modification to how we call the REST API. We usually end the call with a “.value” to get the value, but in order to get the “nextLink” field we cannot do that.
  $call = (Invoke-RestMethod -Method "Get" -Uri $url -Headers $authHeader )
  $results = $call.value
  $nextLink = $call.nextLink
Now it is just a simple do-until call. After we get done iterating through the incidents that one REST API call has made, we will output the results and clear out the object that stores that information. This will save a lot of memory during the call. We then make another call to the REST API like we do above, but instead of using the “$url” we will use the “$nextLink” variable. We will keep doing this until there is no more calls that need to be made.
do {
    foreach ($tactic in $tacticHash.keys) {
      foreach ($technique in $tacticHash[$tactic]) {
        foreach ($result in ($results.properties | Where-Object { ($_.additionalData.techniques -eq $technique) -and ($_.additionalData.tactics -eq $tactic) })) {
          $newRow = $outputObject.NewRow()
          $newRow.Tactic = $tactic
          $newRow.Technique = $technique
          $newRow.Name = $techniqueNameHash[$technique]
          $newRow.Description = $techniqueDescriptionHash[$technique]
          $newRow.IncidentName = $result.title
          $newRow.IncidentNumber = $result.incidentNumber
          $newRow.Status = $result.status

          [void]$outputObject.Rows.Add($newRow )
        }
      }
    }
    $outputObject |Export-Csv -QuoteFields "Description", "RuleName", "IncidentName" -Path $FileName -Append
    $outputObject.Clear()
    $results = $null
    if ($null -ne $nextLink) {
      $call = (Invoke-RestMethod -Method "Get" -Uri $nextLink -Headers $authHeader )
      $results = $call.value
      $nextLink = $call.nextLink
    }
  }
  until ($null -eq $results)
Summary
This post explains how to create a form to allow for user input and then output all the incidents using a looping mechanism. You can now get a listing of all the incidents that match the different tactics/techniques Microsoft Sentinel uses.