Introduction
The new ability to add tasks to an incident in Microsoft Sentinel is one of the best new features IMHO. It takes one big step forward in being able to completely handle the complete incident investigation within Microsoft Sentinel.
As of right now, you can either run an automation rule or use the Microsoft Sentinel Logic App action to add tasks to an incident. That works pretty well but there may be times when you want to add a task outside of these scenarios, perhaps in an Azure function.
This post will explain how to do that.
Adding a task
In order to add a task programmatically, you will need to use the, as yet unpublished, December 2022 api version. Using the programmer’s tools in Edge, I was able to figure out what call was being made when a task was being added. See my post, How do I determine what API Microsoft Sentinel is using? – Yet Another Security Blog (garybushey.com), on how I did that.
To add a new task to an incident, you need to login normally and get your authorization header (you can read Your first Azure Sentinel REST API call – Yet Another Security Blog (garybushey.com) if you are unsure how to do this). You will also need to know the incident’s GUID, since you are adding a task to that incident. Finally, you will need to generate a GUID for the task you are adding. You will also need to send a body that contains all the information for the task.
The actual REST API URL looks like:
https://management.azure.com/subscriptions/<subscriptionId>/resourcegroups/<resourceGroupName>/providers/microsoft.operationalinsights/workspaces/<workspaceName>/providers/microsoft.securityinsights/incidents/<incidentGuid>/tasks/<taskGuid>?api-version=2022-12-01-previewOf course, you need to fill in the appropriate values.
The body will look like
$body = @{
    "properties" = @{
        "title"       = "Testing API Call again"
        "description" = "<div>This is a test</div>"
        "status"      = "New"
    }
}
The “title” field will be the title of the entry, “description” is the HTML code that will be used to show the description. Keep in mind that not all HTML features may be supported.
Finally, the “status” may be either “New” in which case the task will show up as active or “Completed” in which case it will show up as completed.
Here is the full code that I have used to add a task to an existing incident. Keep in mind that you will need to add the appropriate values for the URL to work correctly
$context = Get-AzContext
$azureProfile = [Microsoft.Azure.Commands.Common.Authentication.Abstractions.AzureRmProfileProvider]::Instance.Profile
$profileClient = New-Object -TypeName Microsoft.Azure.Commands.ResourceManager.Common.RMProfileClient -ArgumentList ($azureProfile)
$token = $profileClient.AcquireAccessToken($context.Subscription.TenantId)
$authHeader = @{
    'Content-Type'  = 'application/json'
    'Authorization' = 'Bearer ' + $token.AccessToken
}
$SubscriptionId = $context.Subscription.Id

$taskGuid = [guid]::NewGuid()

$body = @{
    "properties" = @{
        "title"       = "Testing API Call again"
        "description" = "<div>This is a test</div>"
        "status"      = "New"
    }
}

$uri = "https://management.azure.com/subscriptions/$($subscriptionId)/resourcegroups/<resourceGroupName>/providers/microsoft.operationalinsights/workspaces/<workspaceName>/providers/microsoft.securityinsights/incidents/<incidentID>/tasks/$($taskGuid)?api-version=2022-12-01-preview"

$verdict = Invoke-RestMethod -Uri $uri -Method PUT -Headers $authHeader -Body ($body | ConvertTo-Json -EnumsAsStrings -Depth 5)
Notice on line 11 the code to generate a new GUID.
BTW, if the task’s GUID already exists, the task will be updated. This is how you can close the task via code. Just change the “status” field in the body to “Completed” to close the task.
Listing tasks
If you have worked with the Microsoft Sentinel REST APIs for a while, you have probably already guessed how to list the tasks for an incident. It is the same URL that we discussed, except that you do not include the task GUID and you make a “GET” REST API call, rather than a “PUT”. If you want to see just a single task, you can include the task’s GUID, however I don’t see myself using that call too much.
https://management.azure.com/subscriptions/<subscriptionId>/resourcegroups/<resourceGroupName>/providers/microsoft.operationalinsights/workspaces/<workspaceName>/providers/microsoft.securityinsights/incidents/<incidentGuid>/tasks?api-version=2022-12-01-previewThis will return output like shown below:
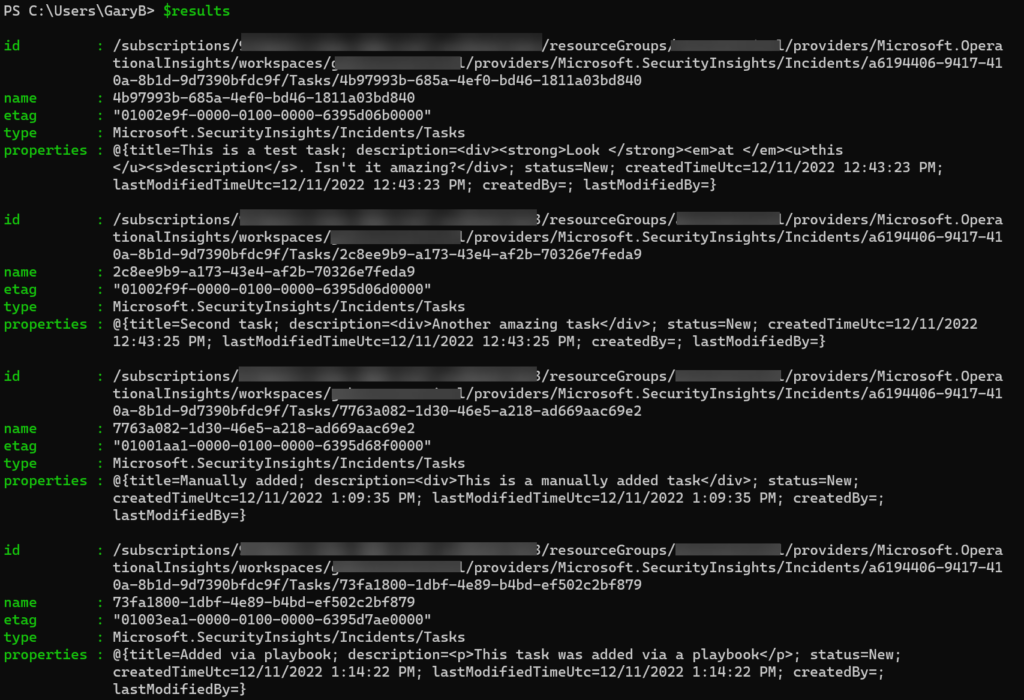
You can see that this incident has four tasks assigned to it. The first two were created by an automation rule, the third was added manually, and the fourth one was added via a playbook. If I were to into the properties and look at either the “createdBy” or “lastModifiedBy” fields, I would see the name of the user or process that added them.
Summary
This post showed how to use the, currently unpublished, Microsoft Sentinel REST API to play with incident’s tasks. I am sure this is just the beginning of what tasks can do and hopefully, when the REST API is published, we will get an inkling as to what the future holds.